No products in the cart.

If you own an Evinrude outboard engine, you know how crucial regular maintenance and quick diagnostics are for performance and reliability. The EvDiag Diagnostic Kit (EVINRUDE EVDiag Scanner) is the ultimate tool for do-it-yourself boaters and marine technicians who want to save time, identify engine issues fast, and avoid costly repairs. In this guide, we’ll walk you through how to use the kit step by step — from connecting it to your Evinrude engine to reading live data and fault codes.
Modern Evinrude engines are smart — they rely on an ECU (Engine Control Unit) or EMM (Engine Management Module) to regulate everything from fuel injection to ignition timing. When something goes wrong, the ECU stores fault codes that help pinpoint the issue.
The EvDiag Diagnostic Kit lets you:
Quickly read and clear fault codes
View live sensor data in real time
Run engine tests and calibrations
Monitor performance trends to prevent breakdowns
Instead of guessing what’s wrong, the EvDiag kit gives you instant insight — just like a professional marine technician.
A complete EvDiag Diagnostic Kit typically includes:
USB interface cable for connecting your laptop to the engine’s diagnostic port
Software (EvDiag Pro) compatible with most Evinrude E-TEC, E-TEC G2, and Ficht engines
User guide and setup instructions
All you need is a Windows laptop and your Evinrude outboard.
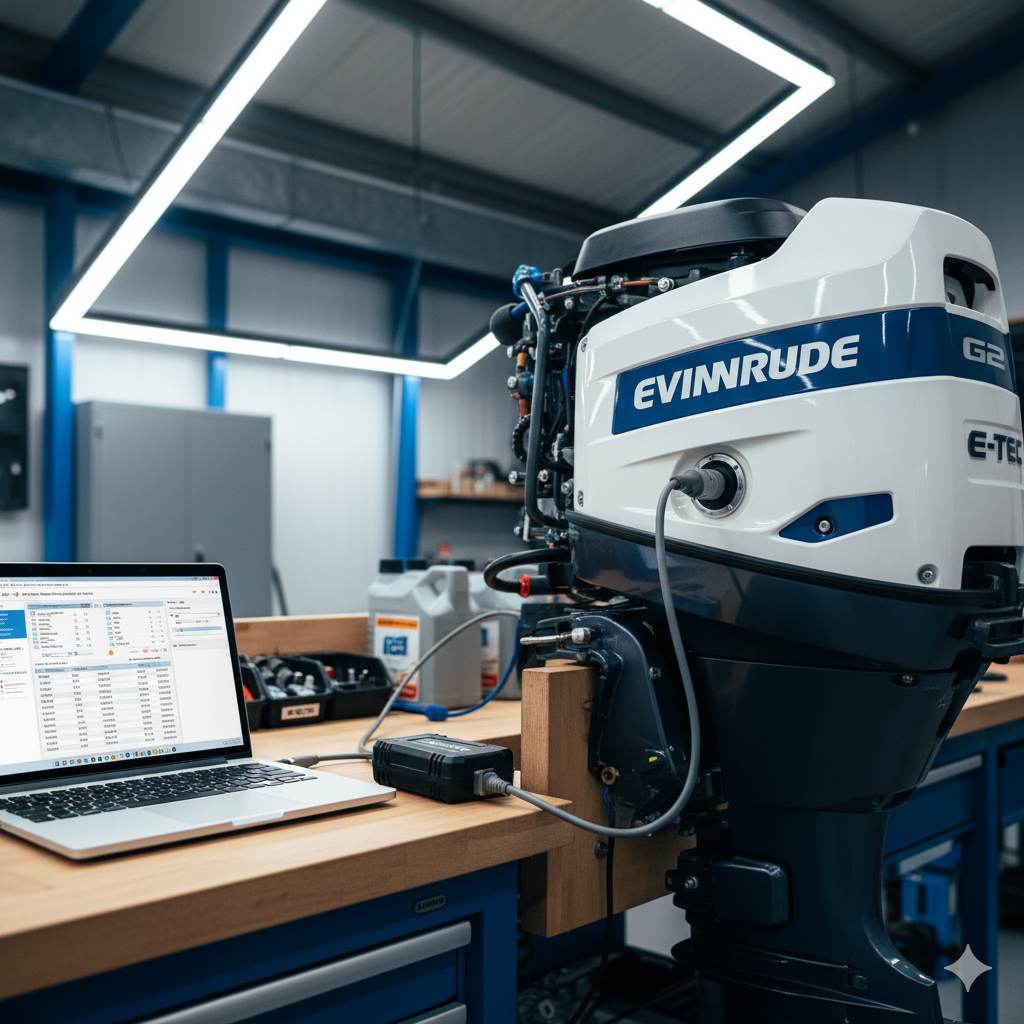
Locate your Evinrude engine’s diagnostic port (usually near the EMM).
Plug the EvDiag interface cable into the port.
Connect the other end to your laptop’s USB port.
(Tip: Always make sure the engine is off when connecting the cable.)
Open the EvDiag Pro software on your laptop.
Select your engine model from the list.
Click “Connect” to establish a link between the software and the EMM.
Once connected, you’ll see your engine’s parameters appear on-screen.
Navigate to the Fault Codes tab.
The software will list all stored and active codes.
Each code comes with a description, making it easy to identify whether it’s a sensor issue, ignition fault, or electrical error.
You can also clear codes after performing repairs to reset the system.
Click the Live Data or Monitor tab to view:
RPM, throttle position, fuel pressure, temperature, voltage, and more.
Real-time graphs showing how the engine responds to throttle and load.
This helps detect irregularities, such as inconsistent fuel delivery or overheating, before they cause damage.
Advanced users can run actuator and calibration tests — for example:
Fuel injector testing
Oil pump priming
EMM reinitialization
These functions help verify that each engine component is performing properly.
EvDiag allows you to save diagnostic sessions or export reports as PDFs — perfect for service records or warranty claims.
DIY-Friendly: No need for dealership visits — diagnose your own engine.
Saves Money: Prevents unnecessary part replacements.
Fast Results: Identify issues instantly through live data and error codes.
Professional Accuracy: The same technology used by certified marine technicians.
Whether you’re maintaining your personal outboard or managing a fleet, the EvDiag kit gives you control, accuracy, and peace of mind every time you’re on the water.
In short: The EvDiag Diagnostic Kit is more than a tool — it’s your engine’s best friend. It helps you catch problems early, optimize performance, and keep your Evinrude running like new.
