No products in the cart.

If you’re setting up your MXL 770 condenser microphone for the first time, you’ve made a great choice — it’s one of the best budget-friendly mics for vocals, instruments, and podcasting. With its warm low-end, crisp high frequencies, and versatile tone shaping, the MXL 770 delivers professional-quality sound right from your home studio.
But to get the most out of it, proper setup matters — especially since it’s a condenser mic that requires 48V phantom power. Let’s walk through everything step-by-step.
Before you start, make sure you have the essentials ready:
MXL 770 microphone
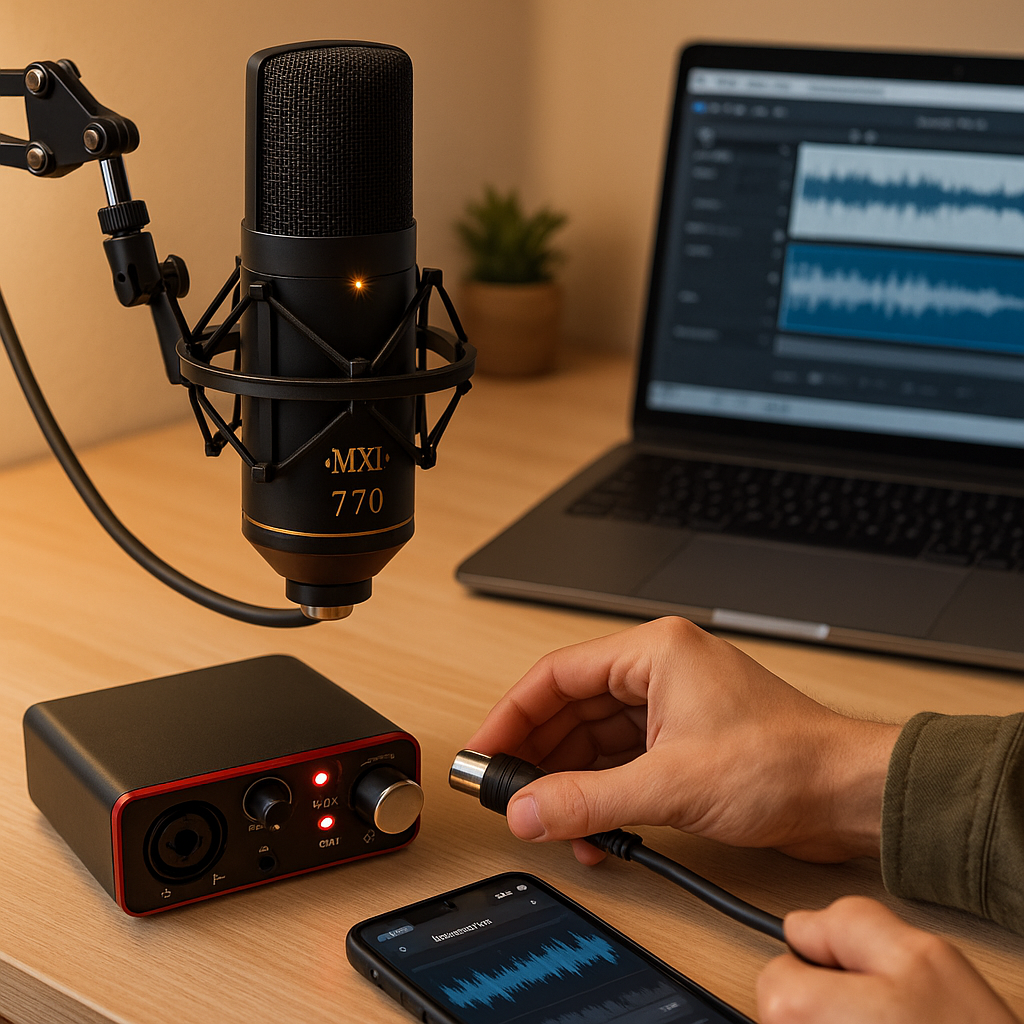
XLR cable (male-to-female)
Audio interface or mixer with 48V phantom power
Mic stand or boom arm
Shock mount and pop filter (usually included with the MXL 770 bundle)
Studio headphones or monitors
This setup ensures clean signal flow and helps isolate your recordings from noise and vibration.
The MXL 770 is a condenser mic, which means it needs 48 volts of phantom power to operate.
Connect one end of the XLR cable to your MXL 770.
Plug the other end into your audio interface’s mic input.
Turn on the 48V phantom power switch on your interface or mixer.
Always connect your mic before enabling phantom power to avoid a loud pop or potential damage to the mic.
You should now see a signal indicator or hear input levels when you speak — your mic is powered and ready.
Placement makes a huge difference in tone and clarity. For vocals:
Position the MXL 770 upright, about 6–8 inches from your mouth.
Use a pop filter to reduce plosive sounds (like “p” and “b”).
For instruments (like guitar or piano), experiment with different angles and distances — 12–24 inches is a good starting point.
Pro Tip: Point the mic’s front side (logo facing you) toward the sound source — the MXL 770 is a cardioid mic, meaning it picks up best from the front and rejects background noise.
On the back of the MXL 770, you’ll find two small switches:
-10 dB Pad Switch
Use this if your sound source is very loud (e.g., drums, amps, or powerful vocals).
It reduces sensitivity and prevents distortion.
High-Pass Filter (HPF) Switch
Engaging this filter cuts low-end rumble (below ~150 Hz).
Ideal for vocals or dialogue recording to eliminate unwanted background hum or mic stand vibrations.
Experiment with these settings — they’re key to tailoring your tone for each recording situation.
Open your recording software (like GarageBand, Audacity, or Pro Tools) and check your input signal:
Start speaking or singing at your normal volume.
Adjust the gain knob on your interface so your peaks stay around -6 dB on your meter.
Avoid clipping (hitting 0 dB), as this causes distortion.
Always monitor with headphones while adjusting gain — you’ll catch issues early and get a better feel for mic tone and noise floor.
Do a short test recording to check clarity and volume. If the sound is too boomy, move slightly farther from the mic or enable the high-pass filter. If it’s too thin, disable the filter and bring the mic closer.
Once you’re happy with your tone, mark your mic position for consistency across sessions.
- XLR cable securely connected
- Phantom power ON (48V)
- Pop filter and shock mount in place
- Proper gain level set
- Pad and HPF switches optimized for your voice/instrument
You’re now ready to record clean, professional-quality audio with your MXL 770.
