No products in the cart.

If you’ve ever spent hours tuckpointing by hand — mortar bag in one hand, trowel in the other — you know how tiring and messy it can get.
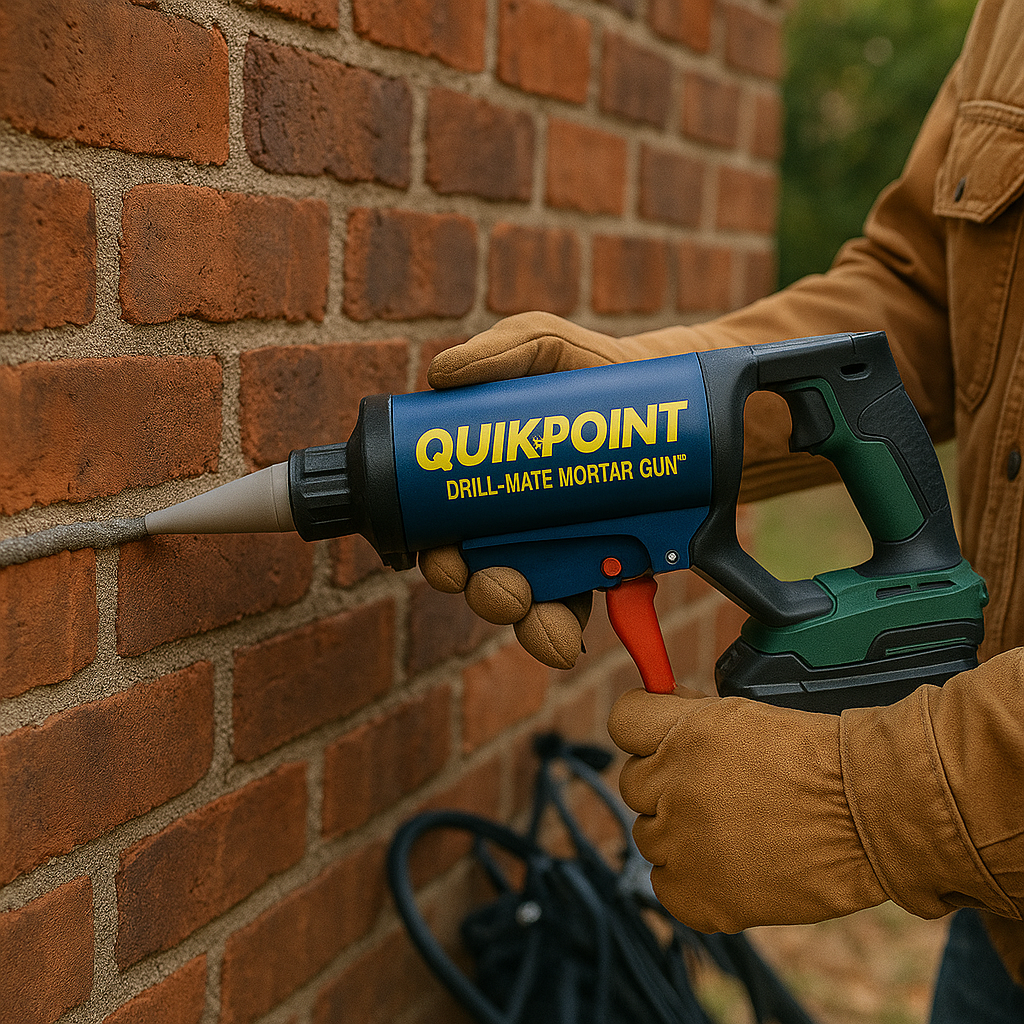
That’s where the QuikPoint Drill-Mate Mortar Gun earns its reputation as a game-changer.
It turns a regular power drill into a fast, clean mortar applicator that can fill joints up to five times faster than manual methods.
Whether you’re repairing old brick joints or laying stone veneer, the Drill-Mate helps you get smooth, consistent results with a lot less effort.
Here’s exactly how to set it up, use it, and keep it clean — step by step.
The QuikPoint Drill-Mate is designed to fit any 3/8-inch variable-speed drill, corded or cordless.
Attaching it takes less than a minute:
- Detach your drill’s chuck and slide the QuikPoint’s drive shaft into place.
- Tighten it firmly — you want a snug fit between the drill and the auger drive.
- Make sure the hopper and handle are facing comfortably for your grip (right or left-handed).
- Test the trigger at low speed to confirm the auger turns smoothly.
Pro Tip: A variable-speed drill gives you better control — start slow until the mortar starts feeding, then increase speed for steady flow.
The 3-quart hopper gives you plenty of material for long runs, saving constant refills.
You can use:
- Standard mortar mix for brick and block work, or
- Pre-mixed pointing compound for thinner joints and veneer stone.
For best results:
- Mix your mortar to a smooth, peanut butter consistency — not runny, but not too thick.
- Avoid chunks or dry pockets; they can slow the auger feed.
- Scoop the mortar into the hopper using a small trowel or scoop.
Once filled, attach the lid or cover to keep debris and air out while you work.
The QuikPoint Drill-Mate comes with interchangeable steel nozzles for different joint widths.
Pick one that matches your project — narrow for brick tuckpointing, wider for stone joints or block work.
Screw the nozzle onto the front of the gun by hand — snug, but not overtight.
Make sure the internal threads are clean and free of dried mortar.
Then, depending on your work surface, you can rotate the nozzle:
- Horizontal joints: Keep it straight or angled slightly upward.
- Vertical joints: Rotate it 90 degrees for better control and visibility.
This flexibility lets you work faster without constantly repositioning your drill or body.
Now for the fun part.
- Press the drill trigger slowly — the auger will start feeding mortar through the nozzle.
- Guide the tip smoothly along the joint, keeping consistent pressure and motion.
- For deep joints, backfill slightly more than flush, then tool it afterward for finish.
You’ll feel the difference immediately — the auger drive pushes mortar evenly, so you don’t have to squeeze or pump manually like with a grout bag.
It’s continuous, controlled, and precise.
For stonework or irregular joints, slightly overfill and tool afterward for a clean, professional finish.
To get the most out of your QuikPoint Drill-Mate, keep these quick tips in mind:
Use the right mix: A standard Type N or S mortar mix works perfectly. For thin brick or veneer, a pre-mix saves cleanup time. Avoid mixes with large aggregate — they can jam the auger.
Keep your drill speed steady: Too fast can splatter; too slow might underfeed. Most pros find a medium speed ideal for control and flow.
Let the auger do the work: Don’t push mortar through by hand pressure. The auger ensures consistent delivery and prevents clogging.
Refill before it runs empty: Running the hopper dry can suck air into the auger. Top off when you’re about three-quarters down.
Mind your joints: For long horizontal runs, overlap slightly at each start and stop point to maintain even lines.
Here’s the beauty of the QuikPoint system — cleanup is ridiculously fast compared to bags or guns.
When you’re done for the day:
- Remove the nozzle and hopper.
- Fill the hopper with clean water.
- Run your drill for 10–15 seconds — this flushes out the auger and tube.
- Rinse the nozzle and let everything air dry.
You can literally clean the entire setup in under a minute.
No digging dried mortar out of bags, no clogs, no rust if you dry the parts properly.
Before storage, make sure all components are dry and lightly coat the auger threads with a small amount of oil if you’re storing it long-term.
Keep the steel nozzles wrapped or in a sealed bag — they’ll last for years if you prevent rust buildup.
The QuikPoint Drill-Mate Mortar Gun isn’t just a tool — it’s a serious time-saver for masons, restorers, and stone installers who want clean joints and faster production.
In just a few minutes, you can mount it, load it, and start laying precise, professional-grade mortar lines without hand fatigue or mess.
And because cleanup takes less than a minute, you can spend more time working — and less time scrubbing tools at the end of the day.
Whether you’re tuckpointing historic brick, laying thin veneer stone, or filling glass block joints, the Drill-Mate delivers consistency, speed, and durability that manual tools just can’t match.
Once you’ve tried it, there’s no going back to the old grout bag.
